Tutorial
Sofily Content Engine
Everything you need to set up SCE and start generating WordPress articles. From first install to your first published post.
Preparations
Before you start using Sofily Content Engine, make sure you have everything ready. This takes about 10 minutes.
- Replicate or Fal.ai account + API key (for text and image generation)
- WordPress website (self-hosted, with HTTPS)
- WordPress Application Password (not your login password!)
- WPCode Lite plugin + Yoast/Rank Math REST API code snippet
- Yoast SEO or Rank Math plugin (either one works)
- Sofily Content Engine license key
1
Create a Replicate Account
Replicate is the AI platform that powers both text and image generation in SCE. You only need this one API key to use all features.
- Open: replicate.com
- Click “Sign Up” (you can use GitHub or Google)
- Go to: replicate.com/account/api-tokens
- Click “Create Token”
- Copy and save the key immediately!
Warning:The key starts with “r8_”. You can always go back to your API tokens page to copy it again. Replicate uses pay-as-you-go pricing — a typical article costs around $0.05–0.15 in API fees.
2
Create a WordPress Application Password
SCE uses an Application Password to securely connect to your WordPress site via the REST API. This is a separate password — NOT your WordPress login password.
- WordPress Admin → Users → Profile
- Scroll down to “Application Passwords”
- Name: Sofily Content Engine
- Click “Add New Application Password”
- Copy the password immediately and save it somewhere safe!
Warning:WordPress shows this password only once! Format: xxxx xxxx xxxx xxxx xxxx xxxx. If you lose it, just create a new one.
3
Enable SEO Plugin REST API (Yoast or Rank Math)
For SCE to automatically fill in your SEO fields (Focus Keyphrase, Meta Title, Meta Description), a short PHP code snippet is needed. This works with both Yoast SEO and Rank Math — SCE auto-detects which plugin you use.
- WordPress Admin → Plugins → Add New
- Search: WPCode Lite → Install → Activate
- WordPress Admin → Code Snippets → Add Snippet
- Select “Add Your Custom Code” → “Use Snippet”
- Title: “Sofily Content Engine – SEO REST API”
- Code Type: PHP Snippet
- Paste the code from the Starter Guide PDF (included with your download)
- Turn it ON (Active) → “Save Snippet”
Warning:Without this step, your SEO fields will remain empty after article generation. The article itself will still work fine — only the Yoast/Rank Math fields will be missing.
4
Activate Your License
Launch Sofily Content Engine. The License window appears automatically on first run. Paste your license key (from your Lemon Squeezy purchase email) and click “Activate”. You’ll see your plan, expiry date, and activation count.
Quick Start
Already completed the preparations? Generate your first article in 4 steps.
1
Add Your Replicate API Key
Go to Settings → API Keys → Paste your Replicate key (starts with “r8_”) → Click Save.
2
Connect Your WordPress Site
WordPress Sites → Enter your site name, URL (must start with https://), admin username, and Application Password → Click Add → Test the connection.
3
Enter Your Topics
Go to Classic Articles or Listicle Articles → Type your article topics (one per line) → Click “Add to Queue”. Use specific topics like “How to Start a Vegetable Garden in Small Spaces” rather than just “gardening”.
4
Generate!
Go to Article Queue → Click “Generate All” → Wait ~2-5 minutes per article. When done, your articles appear as drafts in WordPress — review them, make any edits, then publish when ready.
Program Overview
A closer look at every feature inside Sofily Content Engine.
Classic Articles
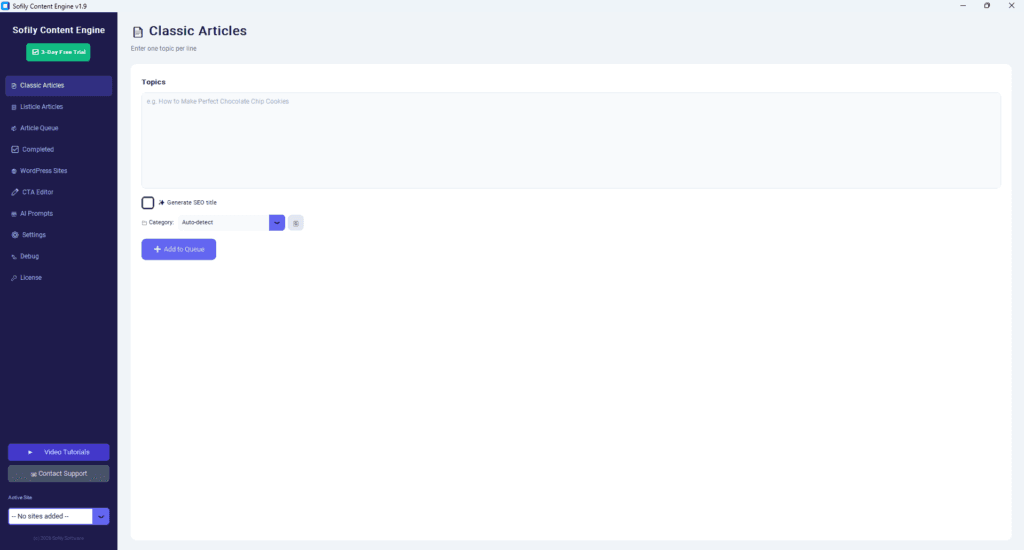
Full-length blog posts with 5-7 H2 sections, introduction, conclusion, 5 FAQ entries with schema markup, and AI-generated images for each section. Just enter a topic and the AI handles the rest — including SEO title, meta description, and focus keyphrase.
Listicle Articles

List-style “Top 10” or “Best of” articles. The number in your title determines how many sections and images are generated. Example: “10 Best Kitchen Gadgets for Small Apartments” creates 10 sections, each with its own AI image.
Article Queue
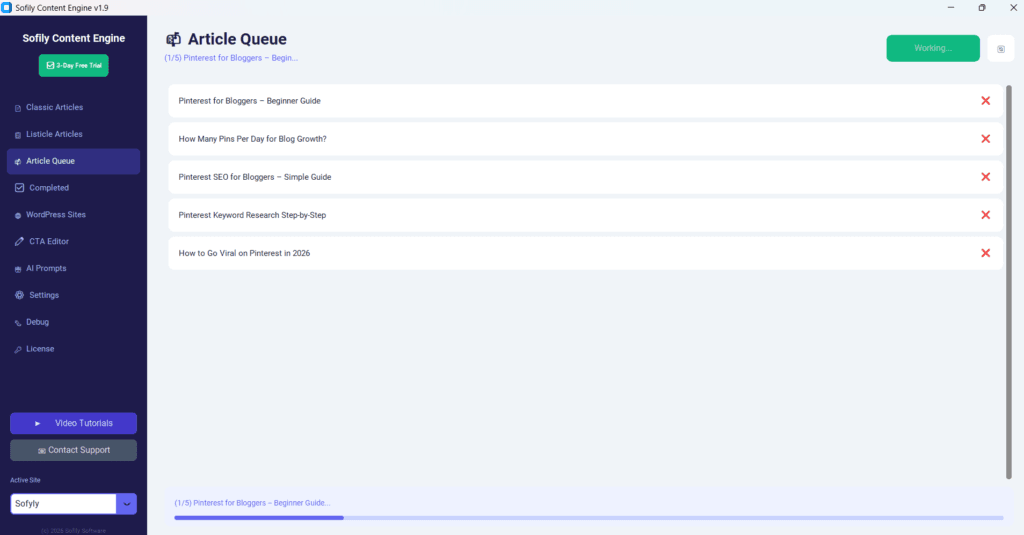
Add multiple topics at once and generate them all in a batch. The progress bar shows real-time status for each article. Great for overnight generation — queue up 10-20 topics before bed, wake up to finished drafts. Do NOT close the program during generation.
Completed Articles
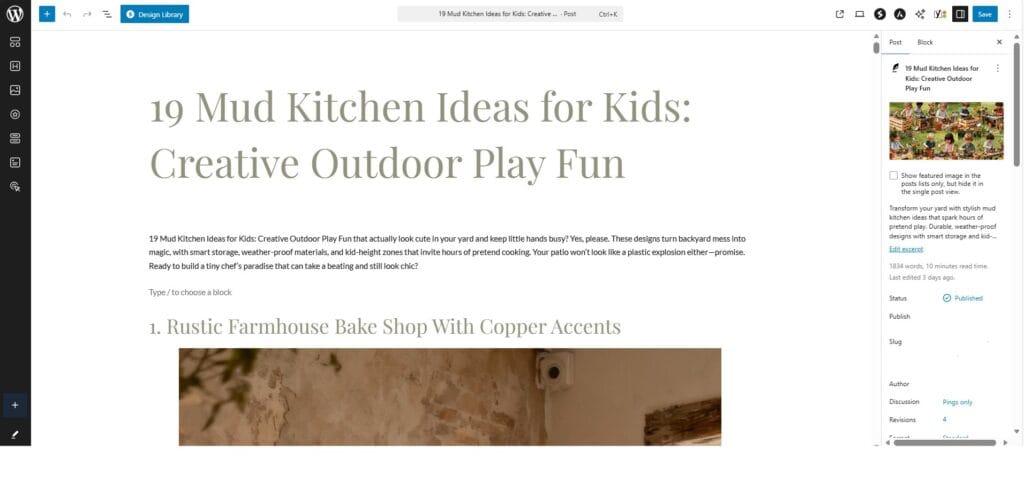
View all finished articles with clickable links directly to your WordPress drafts. Every article is uploaded as a DRAFT — you always review and edit before publishing. Delete individual articles or clear the entire list.
Smart Prompt Wizard
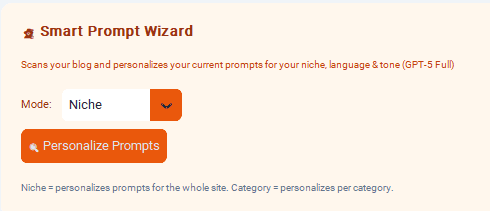
The Wizard reads your existing blog posts and learns your writing style, tone, and voice. It then generates a personalized prompt so AI-created articles sound like you wrote them. Two modes: Niche (analyzes your whole blog) or Category (matches a specific category’s style).
CTA Editor
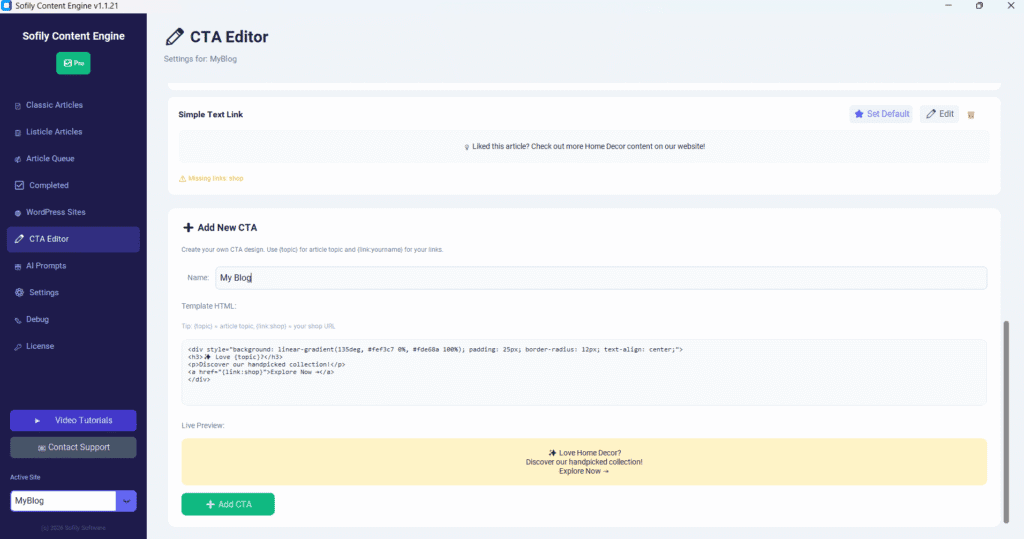
Create Call-to-Action blocks in HTML. Use {topic} to insert the article topic automatically, and {link:name} for your saved links. 4 built-in templates included (Warm Gradient, Red Seasonal, Purple Newsletter, Simple Text). Mark one as default with ⭐ to auto-add it to every article.
AI Prompts
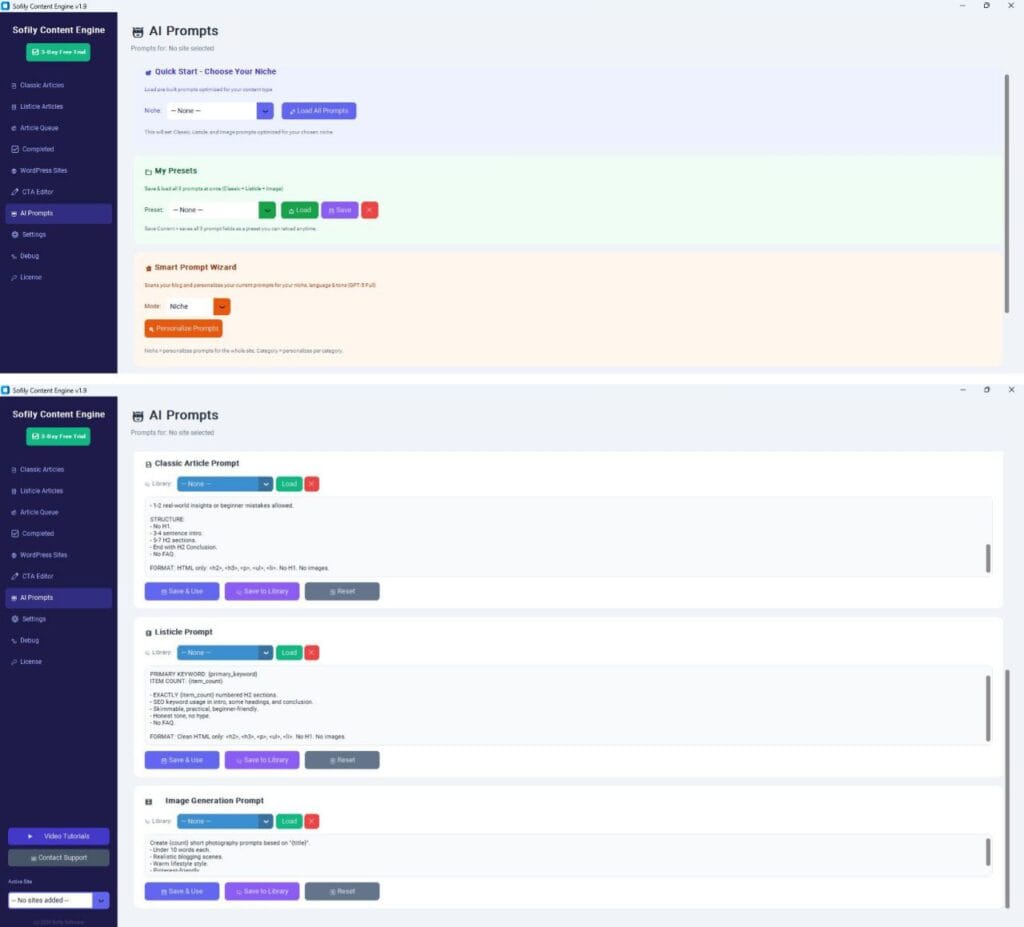
Full control over how the AI writes. 3 prompt types: Classic Article, Listicle, and Image. 8 professional niche templates included to get you started. Save your best prompts to the library, and assign different prompts to different WordPress sites.
Multi-Language & Multi-Site
Generate articles in 25 languages including English, German, Spanish, French, Hungarian, and many more. Manage unlimited WordPress sites — each with its own language, prompts, image settings, and CTA templates. Switch between sites with the Active Site selector.
Settings Guide
Configure Sofily Content Engine to match your workflow and budget.
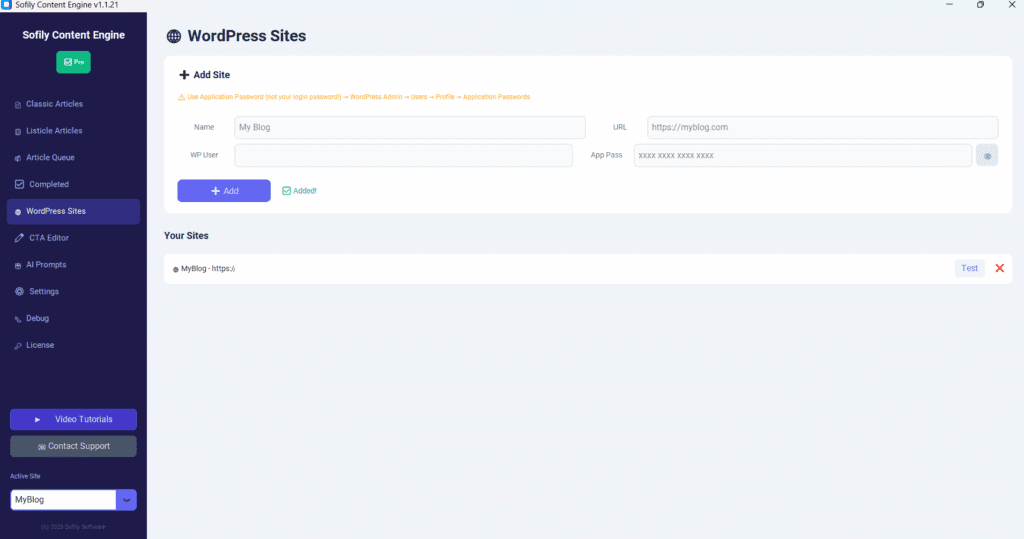
WordPress Sites
Add unlimited WordPress sites. For each site, enter: Name, URL (must be HTTPS), admin Username, and Application Password. Always use the Test button to verify the connection before generating articles.
Common errors: 401 = wrong Application Password, 404 = wrong URL or REST API disabled, Timeout = server not responding
API Keys
Your Replicate API key is the only key you need. It powers both text generation (GPT-5 models, Llama 3) and image generation (Flux, Seedream). The key starts with “r8_”. SCE also has built-in backup fallback to OpenAI and BytePlus APIs in case of Replicate downtime.
Pay-as-you-go: you only pay for what you generate. No monthly minimums.
Image Settings
Image Models (per image):
- Flux Schnell — $0.003 (Fastest, recommended for bulk)
- Flux Dev — $0.025 (Better quality, more detailed)
- Seedream 4 — $0.03 (ByteDance model)
- Seedream 4.5 — $0.04 (Best image quality)
Aspect Ratio: 16:9 (landscape) for standard blog posts, 9:16 (portrait) for Pinterest-focused content.
Text Models
- GPT-5 Mini — Fast and affordable (Recommended for most users)
- GPT-5 (Full) — Best writing quality, higher cost
- GPT-5 Nano — Fastest generation, simpler text
- GPT-4.1 (Legacy) — Previous generation model
- Llama 3 70B — Meta’s open model, free to use
Tip: Start with GPT-5 Mini for everyday use. Use GPT-5 Full for high-value pillar content. The Smart Prompt Wizard always uses GPT-5 Full for best analysis results.
Image Compression
Enable compression to dramatically reduce image file sizes for faster page loads. Converts PNG to JPEG and reduces file size by 50-80% with minimal visual difference. Set quality between 50-100%.
Recommended: 85% quality. Example: 2.1 MB → 650 KB (69% savings) with no visible difference at normal viewing size.
Link Library & CTA
Save your important links (shop, newsletter signup, YouTube channel, affiliate links) in the Link Library. Reference them in CTA templates using {link:name} — for example, {link:shop} inserts your shop URL automatically. Mark one CTA template as default with ⭐ to include it in every generated article.
Video Tutorials
Step-by-step video walkthroughs are coming soon. We’re currently recording tutorials covering installation, setup, article generation, and advanced features like the Smart Prompt Wizard.
Quick Start in 5 Minutes
From install to first article — coming soon
WordPress Site Setup
Application Password, WPCode, and connection — coming soon
Custom Prompts & Smart Wizard
Prompt customization and style matching — coming soon
Subscribe to our YouTube channel to get notified when new tutorials are published.
Tips & Best Practices
Write Specific Topics
The more specific your title, the better the article. Use descriptive titles like “How to Make Perfect Sourdough Bread at Home” or “10 Best Coffee Makers Under $100 for Small Kitchens”. Avoid single-word or vague topics like “coffee” or “best things”.
Keep API Costs Low
Use GPT-5 Mini + Flux Schnell ($0.003/image) for the most affordable generation. Reduce the number of section images in Settings and enable compression to keep uploads small and fast.
Use the Smart Prompt Wizard
Before generating articles for an existing blog, run the Wizard first. It reads your published posts and creates a custom prompt that matches your style. This makes AI content feel consistent with what you’ve already written.
Overnight Batch Generation
Create a list of 10-20 topics, add them all to the queue, and start generation before going to bed. Each article takes ~2-5 minutes. In the morning, you’ll have a full set of WordPress drafts ready for review and publishing.
Pick the Right Image Settings
Use 16:9 (Landscape) for standard blog posts and 9:16 (Portrait) for Pinterest-heavy niches like home decor or recipes. Set compression to 85% for the best balance between quality and file size — your readers won’t notice the difference, but your page speed will.
Always Review Before Publishing
Every article is saved as a DRAFT on purpose. Read it through, add your personal perspective, check the facts, and tweak anything that doesn’t sound right. AI-generated content is your starting point — your edits make it truly yours.
Troubleshooting
Running into an issue? Here are the most common errors and how to fix them.
401 Unauthorized
Cause: Wrong or expired password
Fix: Make sure you’re using your Application Password, NOT your WordPress login password. If in doubt, create a new Application Password (Users → Profile → Application Passwords).
404 Not Found
Cause: Wrong URL or REST API disabled
Fix: Double-check your site URL. It must use HTTPS (not HTTP) and should not include “/wp-admin” or trailing slashes. Some security plugins disable the REST API — check your plugin settings if the URL is correct.
Connection Timeout
Cause: Server not responding
Fix: Check your internet connection, then try again. If it persists, your hosting server may be slow or overloaded — contact your hosting provider or try during off-peak hours.
SEO Fields Empty
Cause: Missing WPCode PHP snippet
Fix: Make sure you completed Preparations Step 3 — the WPCode snippet must be installed and set to Active. This applies to both Yoast SEO and Rank Math users.
Images Not Uploading
Cause: Media library issue or server upload limit
Fix: Check your WordPress media settings and hosting server’s upload size limit (usually 2MB-64MB). Enabling image compression in SCE Settings often solves this by reducing file sizes significantly.
Need More Help?
Go to the Debug page in SCE → Click “Export Logs” to download a ZIP file → Send it to Discord server or support@sofilysoftware.com along with a description of the issue and any screenshots. Our logs are sanitized — your API keys and passwords are automatically removed.
Still Need Help?
Can’t find what you’re looking for? Reach out and we’ll help you get set up.